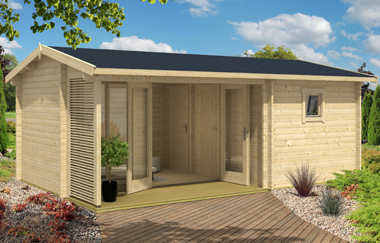
Friday, June 19, 2009

Nottingham log cabin video

The Nottingham log cabin is available from cabin living for £6200 including roof shingles and delivery.


Window shutters available for £195
Verandah available for £295

We can install this log cabin for £1755

Don't delay visit our site today!

Thursday, June 11, 2009

Garden Office - Scotland

Garden office space can be a quick solution to creating extra space with minimal disruption to the family home. With a young family and another baby on the way a Garden Room from Cabin Living is the perfect solution.

The site in this case was on a slope in a tiered rear garden.


The timber shown is close to level so this gives a fairly good indication of the gradient.


Blockwork is in place front and back to support the surrounding ground prior to lating the concrete slab.

Here you can see the ballast and ramps up the paths to the back garden. A base of this size will take 4-5 ton bags to complete.
Mixing within the base, can save time and ensures a mess free build.

Base is mixed, levelled and left to set. It is advisable to complete beasework a few days prior to the cabin delivery.


Not many pictures of the initial build this time!


Up to roof height and ready to fit the tongue and groove roof boards.


The interior of the Aylesbury log cabin.


Celotex insulation was fitted between the joists in this case as the floor joists have a depth of 70mm which is sufficient to take the 50mm celotex boards.
A nail gun or two makes light work of laying the floor and fixing the roof boards.

Insulated ceilings help to reduce heat loss in winter and reduce the heat penetration through the roof in summer. 50mm rockwool slabs and tape and jointed plasterboard are installed in the ceiling as part of the garden office insulation option.
As part of your garden office installation we do offer to paint internally or externally but in this case the customer opted to do this work themselves.


Our final part of the installtion is connection of electrics and a network cable.


Cat5e network socket and one of the double sockets for power.

Mini consumer unit fitted in the cabin. As part of the installation the main consumer unit in the home was also upgraded to meet cuurent regulations.

The customer chose to paint the interioir, this is an option or alternatively in can be left as natural wood,varnished or coated in linseed oil.


We hope to have an update with decking and a painted exterior soon.

Friday, May 8, 2009

Corner log cabin in Chobham, Surrey

Similar to one of our existing garden office buildings the Carlisle log cabin but not quite big enough we produced a unique version to our customers specification.

The log cabin is complete with adjoining store and is intended to be used for occasional dining and running a pottery and porcelain painting class.

We insulated the walls, floor and ceiling and fitted underfloor heating as well as plenty of sockets for all the art equipment.

Concrete base in place and we are ready for the log cabin assembly to begin.


Having arranged the timbers assembly can begin. Windows and doors are slotted into place before the walls get too high.


Up to roof height. As this is a bespoke cabin and it is a double hipped roof it takes a little bit longer to assemble than standard log cabin kit roofs.


The roof framework is complete and roof boards are ready to be fixed down. Again ths is quite time consuming as each board had to be cut with a 45 degree chamfer with this roof style.


Roof boards and bitumen roof tiles in place, we can finally concentrate on the interior. Our client required the ceiling, walls and floor to be insulated and also required underfloor heating.

Battens are fixed to the walls on 600mm centres and 50mm thick rock wool slabs are fitted between them.


I created a wooden frame surrounding the actual window frame which had a 12.5mm rebate on the outside edge. This would therefore accept the 12.5mmm plasterboard creating a neat finish around the windows. In thoery you could plasterboard the return into the window and finish the edges with corner tape but this seemed like a neat and effective and quick solution to the problem.


Tape and jointing is finished and the underfloor heating is in place above the floor insulation.
We use the "Warmup" system which consists of a heating element in a foil layer which is ideal for laminate floors. The system has a temperature sensor fitted beneath the floor and power is supplied through an RCD controlled socket. The temmperature is controlled by a control panel which can be mounted anywhere in the room. Finished with oak effect laminate flooring it will then be ready for painting.


Walls are painted with two coats of magnolia emulsion. You should be able to make out the temperature control for the underfloor heating on the far wall.


The finished window frame worked very well.


Ligthing has been added and we can start to pack up tools.


The exterior is paineted with two coats of osmo wood stain & protector. This provides a durable long lasting finish which should not need retreatment for at least five years. Osmo paints are not cheap this cabin need 3-4 pots of paint at £45 per tin and it takes a full days labour to apply two coats.

Tuesday, May 5, 2009

A School Log Cabin by Cabin Living

Our log cabin installation for this month is for Elizabeth Selby School in Tower Hamlets just off Bethnal Green Road.

Quite a jounrey getting into Central London and quite a project too!

We were first approached with a request for a log cabin to maximise the space available. They had very specific ideas about the size and needed two classroom spaces which had their own external doors and one partition door. Having found there was not an ideal solution amongst our standard range we suggested the option of a bespoke cabin to match their precise specification.

Following a consultation process we agreed the final design and production began. Here is an initial sketch of the design used in the preliminary stages.


Below is an example of one of the CAD drawings we submitted to our client for approval prior to manufacture.


And below we have the images of the installation process.

Having completed the concrete base for the log cabin the previous week we were ready to start the assembly.


The first task is to organise the timbers and work with the plans to get the basic framework underway.


Many of the timbers in this log cabin were in excess of 8 metres. This is a two and sometimes three person job.


Door frames go in before the walls get too high and similarly windows after two or three wall timbers are in place either side.


Standard wall thickness on our bespoke log cabins is 44mm with double glazed windows and doors. Doors are triple hinged and can be adjusted very easily in three different planes. As well as 44mm walls we can also offer 70mm or dual walled log cabins 44+50+44mm with a cavity suitable for 50mm wall insulation such as Kingspan insulation or Celotex.


Up to roof height and just about to line up the roof joists before fixing them down. They are not lined up yet! A roof of ths size and type is quite different to the standard cabin roofs used in most pre-manufactured kits which tend to slot together very easily. This particular roof was a bit more time consuming.


Finally topped out with tongue and groove we can now make a start on tiling the roof.
As standard we use bitumen roof shingles which we find produce a very attractive finish at a reasonable cost.


Roof tiles on and it is time to lay the floorboards and prepare to insulate the interior. We will be using Celotex insulation for the floor followed by 18mm plywood prior to the final floor covering. The roof is insulated with rock wool slabs and has plasterboard suspended between the roof joists. Wall insulation is another option either by drylining the interior or by building a log cabin with twin walls and a cavity.


A view of the interior as the cabin nears completion.


Insulated roof plasterboarded and painted.


Unique to this cabin we fitted an access panel so that a drain cover could be accessed if required. This involved creating a frame around the manhole cover during the base construction and then creating a frame in the floor to accommodate the insualtion. Finally an access panel was fitted with a recessed handle.


The finished product. 8 metres x 4 metres of additional classroom space with an internal partition and two access doors.


The exterior is painted with Osmo wood stain and protector. We normally apply two coats to provide a more even finish and several years of protection. In this case the shade red cedar was used which ties in well with the Victorian brickwork behind.

View our log cabins

We hope the classroom cabin is a fun learning space for all who use it.

The Cabin Living Team

Monday, March 16, 2009

Log Cabin Installation of the month "The Shed"

In this feature we will be looking at one of our installations each month. Hopefully this will give a bit more insight into the choices you may have to make as part of your own installation.

Here we have a fairly comprehensive installation we recently completed which Alex, our customer likes to call "The Shed".

To start we have the base assembly. Ofcourse this is an option we quote for and the prices for this are shown on every product page. You may choose to build a base yourself or there may already be a base suitable.


Typically we lay a 100mm thick concrete base slightly bigger than the foundation of the log cabin. Alternatives are slabs or a substantial decking frame using not less than 4 x 2 timber.


Normally completed in a day and left to set we are now ready for the log cabin.


This is a 5m x 4m Plymouth log cabin chosen primarily for its wall thickness of 68mm but also for its large open space and suitable window positions. The side windows and door position are reversible on this model.


It was a snowy start this morning. Time to finish the roof boards and fix down the biitumen tiles. On a cabin this size you are likely to take at least 3 hours to fit the tiles if working on your own. There is a choice of bitumen roof tiles with most models in our range. Another option you may consider is a green roof system using sedum to create a living roof though it would be approximately 5 times the cost of bitumen tile roof. We have sourced a supplier of green roof systems and can quote for this on request.


Here we see an internal shot prior to window installation. You may be able to make out the pressure treated floor beams to which we attach damp proof course as standard in all our log cabin installations.


Biutmen tiles still need trimming and wooden side trims are yet to be fitted but this will only be done once we have painted the log cabin.


Door and windows ae now fixed in place so we are now watertight and ready to start working on the interior.


Typical options are roof and floor insulation and obviously an essential to most shed workers is electrical connection and probably broadband networking.


Here we see the start of groundwork for the network and electrical cabling. We will be installing armoured cable for the elctrics, network cable plus an additional cable for telephone. Network cables are laid in conduit for protection.


Typically we run network cables a recommended 100mm or more away from electrical cable.


The picture below shows the route of the network cable which avoids cables being laid near to the electrical ring circuit inside the cabin. You should be able to make out the armoured cable for the electrics. You will get a safety certificate on completion of all electrical work.


You will see we have applied the first of two coats of exterior finish. This is Gard green from the Osmo wood stain and protector range. See the colours here if your are painting your log cabin


Internally we have added roof insulation and plasterboard between the roof joists. We tend to use high density 50mm rockwool slabs in the ceiling and Celotex in the floor but for a little extra you can have Celotex or Kingspan throughout. Click here for more details insulating log cabins


Floor insulation (50mm Celotex) is added above the standard 19mm tongue and groove flooring and then most frequently laminate flooring is added above that. Laminate flooring has the advantage of being easy to maintain. We supply a range of laminate through our Magnet Trade Account. Some customers prefer carpet and therefore fitting plywood of either 12 or 18mm is an option ready for underlay and carpet to be added.


Most log cabins will accommodate the insulation above the standard floor but if you prefer it is possible to increase the size of the floor joists so that insulation can be placed on a sub floor beneath the standard floor. Obviously this would increase the overall height of the log cabin.


Now we see the quality of finish obtained with a second coat of wood protection. A cabin of this size does require 4 x 2.5L tins which is £180 without the labour. This may seem expensive but it is worth spending the money on a high quality finish to ensure your log cabin is well protected. This finish should be sufficient for 5 years of protection at which point another coat can be re-applied.


As a guide if you were painting this size of shed on your own it would take you two full days to paint.


Close to completion a little painting still to do and the paving to go back.


And finally... paving in place, completed painting and installed a happy customer.

One of the neighbours said "I love your new house" in typically dry Scottish humour and with another 20 square metres of living space it certainly has made a difference to the amount of living space available.

We hope you enjoy "The shed" Alex

The Cabin Living Team

Monday, March 9, 2009

Bespoke log cabins may hold the answer to new planning regulations.

As part of our continued efforts to provide the customer with what they want we are offering bespoke log cabins based on any design you choose. Whether it is based on an existing log cabin or a sketch on the back of an envelope we can help you turn it into a reality.

Below is an example of a standard carlisle log cabin from our main range. However we have a customer requiring a bigger sized version so we suggested the bespoke log cabin route.


We have the option to add extra windows, change the size, change the wall thickness and reduce the ridge height to meet new planning rules. As standard our bespoke log cabins are made with 44mm walls and supplied with double glazed windows and doors.


As part of the process of ordering your cabin you will receive CAD drawings of your very own log cabin plans for your perusal to enable you to provide feedback prior to manufacture.


The best bit is we can often match the prices of similar sized models from our standard range and the lead time for delivery is also typically within 4 weeks of final approval.

Monday, February 23, 2009

Expanding your home with Log "Cabin Living" space

Part of our challenge as log cabin installers is making people aware that log cabins are an ideal solution to expanding living space.

Few people are looking to move at the moment and with expanding small businesses or families the question is how make their homes bigger.

Planning rules and the prospect of weeks of dusty disruption put off a lot of those considering extensions. Not to mention the costs.


So with our latest livery we are doing our best to educate...there is an alternative that we think is well worth consideration.